

A classic on any occasion, peanut butter marshmallow squares (AKA confetti bars) are a hit with almost everyone I know.
Those who don't like this slice of heaven either don't like (or can't have) peanut butter OR they've come across a recipe that ran into problems somewhere along the way.
Of course, you need the right ingredients, but, above all else, the perfect peanut butter marshmallow square require patience.
The Perfect Peanut Butter Marshmallow Square Recipe
This delicious dainty only calls for four simple ingredients, but if you don't follow the instructions to a tee, there are many ways this dessert can turn disastrous.
Ingredients
½ cup of salted butter
3 cups of butterscotch chips (This is the equivalent of two bags that hold 270 grams; each bag has 1 ½ cups of chips inside)
2 cups of smooth peanut butter
10 cups of rainbow miniature marshmallows (This is the equivalent of two bags that hold 250 grams of rainbow miniature marshmallows; each bag has five cups of mini marshmallows inside)
Method
Melt the butter on low-medium heat. Keep it moving with a spatula and watch it to make sure it doesn't burn.
Add the butterscotch chips and melt them on low-medium. Keep them moving and make sure the chips melt all the way down, or you'll end up with miniature butterscotch chunks in the final square.

I used to add the chips after the peanut butter, but I've since changed the order and it seems to have had a positive impact on the final product.
Adding the butterscotch chips before the peanut butter helps them melt more uniformly. Plus, I've found that adding the peanut butter before the chips increases your risk of your mixture burning while you wait for the chips to melt down, even if you keep it moving.

Once the butterscotch chips are melted down and you have a silky smooth mixture, as seen in the above photo, add the peanut butter (just one cup at a time) and melt it on low-medium heat.
Once it's melted down and evenly incorporated, take your mixture off the element and let it cool for 10-15 minutes. Keep an eye on it to make sure it doesn't cool to the point of wanting to solidify, but make sure it's not so hot that the marshmallows will melt on contact when you add them.
Note, the length of time it'll need to cool can be affected by the type of cookware you use (aluminum vs. copper vs. stainless steel vs. cast iron). If you use a pot that really holds heat, you'll need to wait longer for the mixture to cool enough to safely mix the marshmallows in.

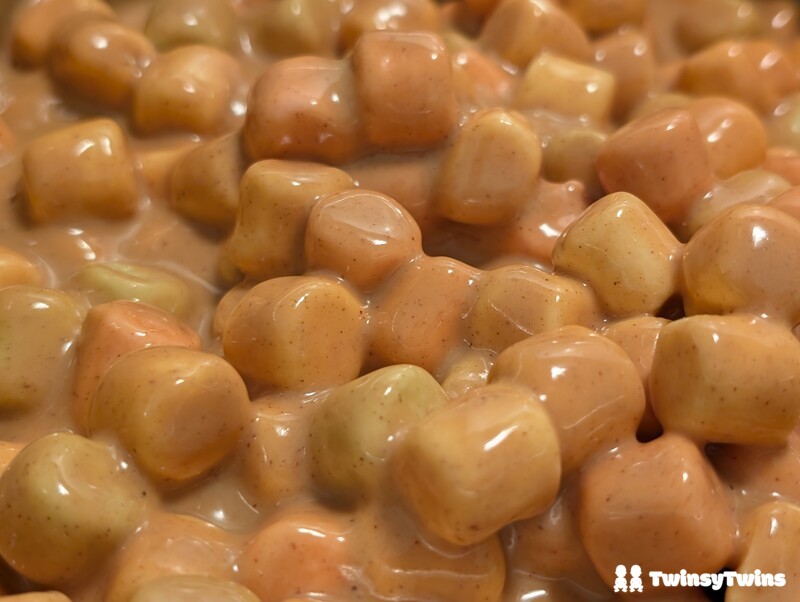
When you think it's safe, add in the miniature marshmallows (one bag at a time, or it'll be too much to fold into the mixture at once). Don't use a whisk for this part. Use a spatula to fold the marshmallows and coat them in the mixture.
The worst is thinking you've waited long enough, only to watch, in holiday-shrouded-horror, as you stir the colorful marshmallows and coat them in the butterscotch-y, peanut-butter-y goodness that you added them in too soon.
Disappointment sets in as you stir and fold and witness the birth of a stretchy, rainbow mess that you know will taste like regret instead of the marshmallow magic it was intended to be because the melted marshmallows change the texture of this tasty treat.
Above all else, be patient. If you feel the urge to turn up the heat to melt things faster, stop yourself. Things can go from melting to burning in a split-second.
Above all else, be patient. If you feel the urge to turn up the heat to melt things faster, stop yourself. Things can go from melting to burning in a split-second.
And, if you have an old, tried-and-true pot, be wary not to stir too aggressively or your mixture may end up with tiny black bits from the pot's coating. I know because this happened to me when someone made me a batch but was in a rush (I know it was the thought that counts, but every time I make this recipe, I remember this important lesson and use a pristine pot).

After you've lined your 9 x 13 pan with parchment paper, use a spatula to carefully spoon the mixture into the dish. Push the marshmallows in first, so that the excess peanut-butter-y part doesn't fill the entire bottom of the dish. You'll want to drizzle any remaining liquid from the pot over the top of the marshmallows so that it can drip down into the middle of the slice evenly.
Cover the pan with tinfoil and then put in the fridge to cool before slicing into squares to devour at your holiday gatherings.
Beware: If you're like us and happen to have garlic sausage in the fridge, you definitely don't want to put this dessert into the fridge to cool—unless you like the taste of garlicky peanut butter. Just wait the extra time for this to solidify naturally while it sits on the counter. But note that it IS easier to slice up when it's chilled from the fridge.
Tips to avoid disaster

Tip #1: After you incorporate the peanut butter, don't mix in the marshmallows too soon, or they'll melt down faster than your toddler when you accidentally give them the exact cup they asked for mere moments ago.
Tip #1: After you incorporate the peanut butter, don't mix in the marshmallows too soon, or they'll melt down faster than your toddler when you accidentally give them the exact cup they asked for mere moments ago.
Tip #2: For easy cutting and clean-up, line your pan with parchment paper, so that once it's cooled, you can lift the entire slice right out of the pan and drop it directly onto your cutting board. No dealing with sticky peanut butter in your Pyrex dish, and no awkward angles when cutting because you don't have to deal with the edges of the pan.
Tip #3: These squares are scrumptious, but they can be very messy. If you're taking these to someone's house, I suggest putting the sliced pieces into festive muffin / cupcake liners, so that whoever's enjoying it ends up with minimal mess on their hands.
Are peanut butter marshmallow squares a staple at your holiday gatherings? Have you ever made them before? Do you have any tips and tricks for the perfect confetti bar? Let us know in the Comments section below or connect with us on Instagram to share your thoughts!
Read more

How to Dye Easter Eggs Like a Pro—with Stuff You Already Have at Home
Easter. A time when we see perfect pastels and delightful designs displayed on exquisite eggs. While there are, without a doubt, some incredibly intricate eggs (Pysanky) that we could never attempt to do at home (at least, not with twin toddlers), there's a super easy way to dye Easter eggs at home with your kids that hardly makes any mess at all. It's so easy, in fact, that I...

3 Ways to Reduce Waste & Embrace Sustainability When You Have Newborn Twins
Earth. The third planet from the sun. The place we call home. With a projected population of about 8.2 billion people for 2025, the United Nations predicts the global population will reach 9 billion in 2037 and 10 billion in 2058. In 1970, when the first Earth Day took place, the estimated world population was approximately 3.68 billion people. Our planet's population is ever-growing...

Do Identical Twins Have Identical Fingerprints? The Truth Revealed
Do identical twins have identical fingerprints? No, identical twins don't have identical fingerprints. While they can share almost 100 percent of their DNA, their fingerprints form after a single zygote splits, so their fingerprints are distinguishable and every person has prints that are unique to them. The not-so-perfect crime When we told people we were pregnant with identical...

Watermelon 101: Slicing Secrets & Stain Removal Guide for Parents
July is National Watermelon Month! Who doesn't like watermelon? Especially on a hot summer day. They're packed with electrolytes, like potassium and magnesium, and antioxidants, like lycopene and vitamins A and C. Made up of about 92 percent water, this fruit is an incredibly refreshing and hydrating treat. They add a pop of color, flavor, and fun to your satiating summertime...