

We may earn a commission for purchases using our links. Learn more.
Easter. A time when we see perfect pastels and delightful designs displayed on exquisite eggs.
While there are, without a doubt, some incredibly intricate eggs (Pysanky) that we could never attempt to do at home (at least, not with twin toddlers), there's a super easy way to dye Easter eggs at home with your kids that hardly makes any mess at all.
It's so easy, in fact, that I confidently handed over the reins to our twin toddlers during several parts of the process and our house wasn't covered in food coloring, egg shells, nor vinegar by the time we were done.
You only need a few things, and the good news is that you've probably already got the supplies in your house.
The even better news is that your kids will love this activity and have a lot of fun while doing it.
After we painted our eggs, when I asked our twins at bedtime, "What's one thing that happened today that made you really happy," the immediate answer was, "Painting eggs."
It instantly made me so happy we made the effort to get the supplies together, which really didn't take long at all, so they could try this fun activity.
Supplies for dyeing eggs

- 6 white hard-boiled eggs (cooled to room temperature)
- Big-lipped plate or bowl to hold the eggs before you paint and while they dry
- Plastic tablecloth
- Muffin pan
- Baking soda
- Water
- Food coloring gel
- White vinegar
- Squeeze bottle (optional)
- Disposable gloves
- Small paintbrushes
- Cup of water for rinsing paintbrushes
- Paper towel to pat your paintbrush dry between paint applications.
Steps for dyeing eggs

- Hard-boil the eggs: Fill a pot with water, bring it to a boil, add the eggs to the water, then turn the heat off and set a timer for 10 minutes. Plunge the eggs in a cold-water bath until they reach room temperature.
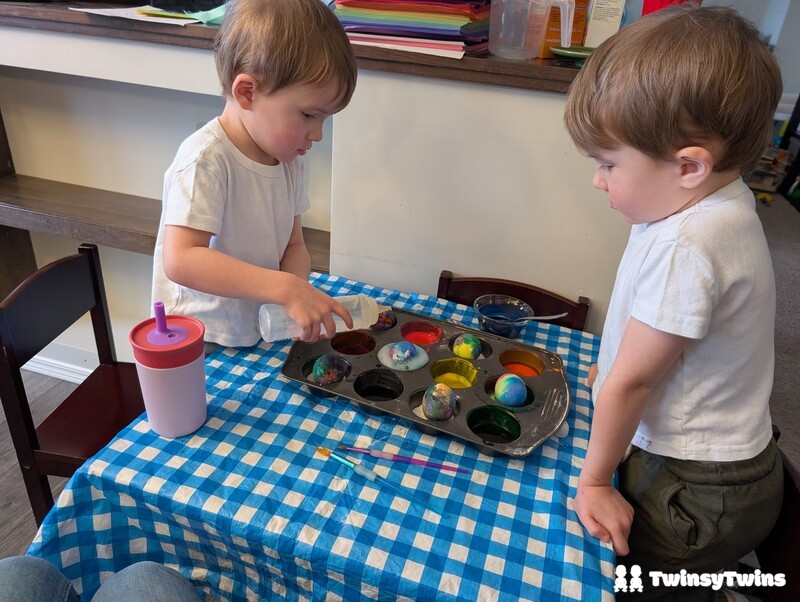
- Make your paint: While the eggs are cooling, prepare the paint. In a muffin tin, add 1-2 tbsp of baking soda to each cup. In six of the cups, add a few drops of food coloring; be creative and mix your existing colors to create new ones you don't have (we used red and blue to make purple and yellow and blue to make green). Add a bit of water at a time to each cup until you have a thick, paint-like paste. You don't want it too thin, or it'll run and cover parts of the egg you might not have wanted to be painted with that color.
- Paint the eggs: Grab an egg and get to work. Use gloves to avoid staining your fingers and hands. You can hold it and paint it, you can place it on the tablecloth and paint, or you can place it in one of the six muffin pan cups that have just baking soda and paint them with a variety of the colors to create a fun design. Use the cup of clean water to rinse your paintbrushes between using different paint colors and then pat them dry on the paper towel so the colors on your egg don't run.
- Watch the magic happen: If you haven't already, fill the squeeze bottle with vinegar. Then, once the eggs are painted, place them into the baking-soda-only cups in the muffin pan. Then, grab your squeeze bottle of vinegar and pour it over each egg to trigger the scientific reaction. The bubbly and colorful fizz as the baking soda and vinegar mix creates a pastel marbled effect on the eggs.
- Leave the eggs to dry: Place the eggs on a big-lipped plate to finish drying. Luckily, it won't take long (more on this below).


The science behind this painting method

The chemical reaction that takes place when you mix the acidic vinegar with the base of the baking soda creates a carbon dioxide gas that distributes the dye and forces the pigment to bind to the calcium carbonate in the eggshell. The reaction causes a fast-drying, marbled effect that immediately bonds the colors to the shell.
Tips for smooth sailing
- Use a pasta spoon to carefully add and remove the eggs to the pot to lower your chances of cracking any eggs.
- Use a variety of colors to create a marbled look on your eggs (our kids wanted to do only one color per egg, but were convinced to use multiple colors once they saw how cool the end result was).
- Disposable gloves can help prevent stained fingers and hands while having fun.
- Use a muffin pan to contain the bubbling mess once you add the vinegar wash to the eggs.
Have you ever dyed Easter eggs with your toddlers? How did it go? Let us know in the Comments section below or connect with us on Instagram to share your thoughts!
Read more

Water Safety: Everything You Need When Your Twins Start Swimming Lessons
When it comes to having twins, there's mention of twice the diapers, twice the work, double the giggles, and double the love, but one thing that doesn't really come up are the challenges that come when you have to sign up multiple children for the same activity at the same time. Sometimes, it's not an issue. But when there are limited spaces available, and you have twins, you suddenly...

Spring Cleaning: 6 Ways to Tackle the Messes that Come with Twin Toddlers
With the unending and oh-so-creative messes that come with having twin toddlers, you need to have a solid game plan for tackling everyday messes. The regular ones, like random cereal bits that accidentally fell to the floor during breakfast...and the unexpected ones, like the juicebox that got squeezed too tightly while someone was sitting on the couch or the container of baby lotion...

It’s Hip to be Square: How to Make Peanut Butter Marshmallow Squares
A classic on any occasion, peanut butter marshmallow squares (AKA confetti bars) are a hit with almost everyone I know. Those who don't like this slice of heaven either don't like (or can't have) peanut butter OR they've come across a recipe that ran into problems somewhere along the way. Of course, you need the right ingredients, but, above all else, the perfect peanut butter...

Simple Features Parents Can Use to Keep Their Tech-Savvy Kids Safer
Keeping our kids safe in the real world is challenging enough. Add to that the additional parental territory that comes with allowing your children to use smart devices, like phones or tablets, and, suddenly, you're in a whole new ballgame. Well, TWO whole new ballgames, if you've got twins whose activities you're trying to monitor. Fortunately, Apple has recently unveiled some new...